Screenshot of CMake configuration
Note that installing all of the development prerequisites and libraries will require about 30 GB of free disk space. Please ensure this space is available on your C: drive before proceeding.
This guide assumes you are on a 64-bit system. You might need to manually search out alternate download links should you desire to build Chatterino on a 32-bit system.
Visual Studio 2022
Download and install Visual Studio 2022 Community. In the installer, select "Desktop development with C++" and "Universal Windows Platform development".
Notes:
- This installation will take about 17 GB of disk space
- You do not need to sign in with a Microsoft account after setup completes. You may simply exit the login dialog.
Boost
- First, download a boost installer appropriate for your version of Visual Studio.
- Visit the downloads list on SourceForge.
- Select the latest version from the list.
Download the
.exefile appropriate to your Visual Studio installation version and system bitness (choose-64for 64-bit systems). Visual Studio versions map as follows:14.3in the filename corresponds to MSVC 2022,14.2to 2019,14.1to 2017,14.0to 2015. Anything prior to Visual Studio 2015 is unsupported. Please upgrade should you have an older installation.Convenience link for Visual Studio 2022: boost_1_79_0-msvc-14.3-64.exe
- When prompted where to install Boost, set the location to
C:\local\boost. - After the installation finishes, rename the
C:\local\boost\lib64-msvc-14.3(or similar) directory to simplylib(C:\local\boost\lib).
Note: This installation will take about 2.1 GB of disk space.
OpenSSL
For our websocket library, we need OpenSSL 1.1
- Download OpenSSL for windows, version
1.1.1s: Download - When prompted, install OpenSSL to
C:\local\openssl - When prompted, copy the OpenSSL DLLs to "The OpenSSL binaries (/bin) directory".
For Qt SSL, we need OpenSSL 1.0
- Download OpenSSL for Windows, version
1.0.2u: Download - When prompted, install it to any arbitrary empty directory.
- When prompted, copy the OpenSSL DLLs to "The OpenSSL binaries (/bin) directory".
- Copy the OpenSSL 1.0 files from its
\binfolder toC:\local\bin(You will need to create the folder) - Then copy the OpenSSL 1.1 files from its
\binfolder toC:\local\bin(Overwrite any duplicate files) - Add
C:\local\binto your path folder (Follow the guide here if you don't know how to do it)
If the 1.1.x download link above does not work, try downloading the similar 1.1.x version found here. Note: Don't download the "light" installer, it does not have the required files.

Note: This installation will take about 200 MB of disk space.
Qt
- Visit the Qt Open Source Page.
- Scroll down to the bottom
- Then select "Download the Qt Online Installer"
Notes:
- Installing the latest stable Qt version is advised for new installations, but if you want to use your existing installation please ensure you are running Qt 5.12 or later.
When prompted which components to install:
- Unfold the tree element that says "Qt"
- Unfold the top most tree element (latest stable Qt version, e.g.
Qt 5.15.2) - Under this version, select the following entries:
MSVC 2019 64-bit(or alternative version if you are using that)Qt WebEngine(optional)
- Under the "Tools" tree element (at the bottom), ensure that
Qt Creator X.X.XandDebugging Tools for Windowsare selected. (they should be checked by default) - Continue through the installer and let the installer finish installing Qt.
Note: This installation will take about 2 GB of disk space.
Compile with Breakpad support (Optional)
Compiling with Breakpad support enables crash reports that can be of use for developing/beta versions of Chatterino. If you have no interest in reporting crashes anyways, this optional dependency will probably be of no use to you.
- Open up
lib/qBreakpad/handler/handler.proin Qt Creator - Build it in whichever mode you want to build Chatterino in (Debug/Profile/Release)
- Copy the newly built
qBreakpad.libto the following directory:lib/qBreakpad/build/handler(You will have to manually create this directory)
Run the build in Qt Creator
- Open the
CMakeLists.txtfile by double-clicking it, or by opening it via Qt Creator. - You will be presented with a screen that is titled "Configure Project". In this screen, you should have at least one option present ready to be configured, like this:
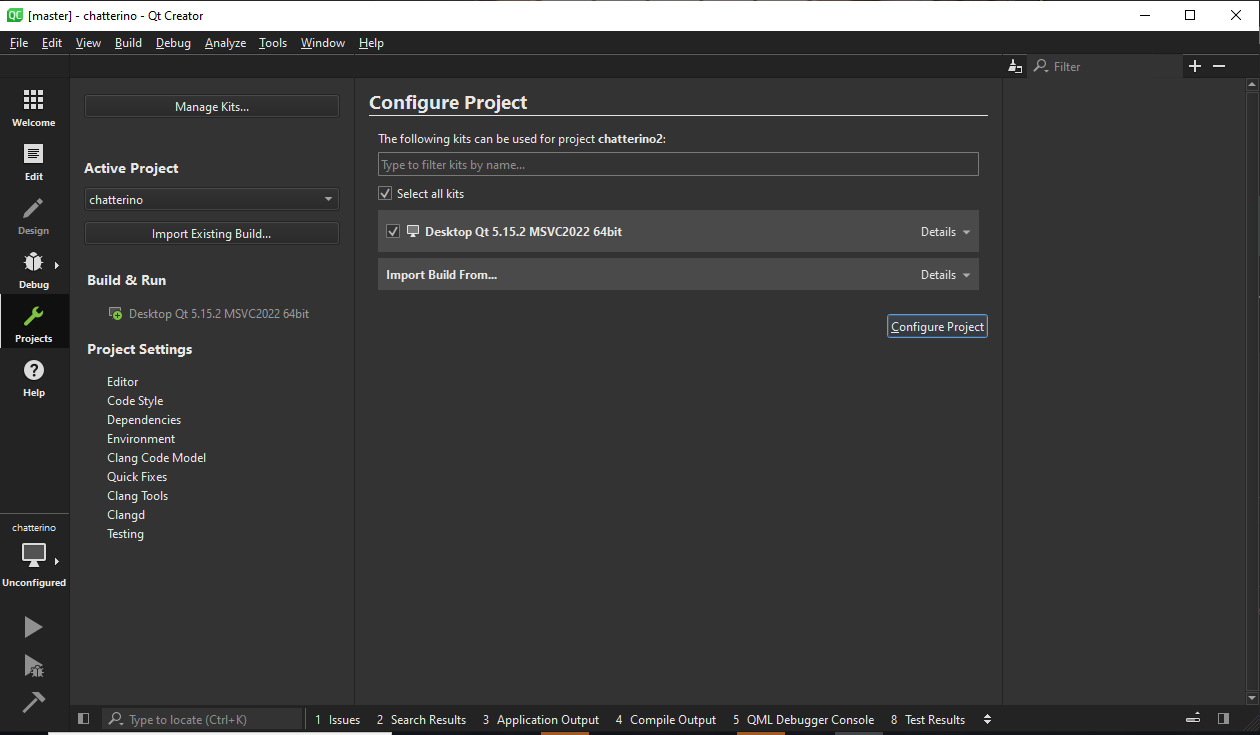
- Select the profile(s) you want to build with and click "Configure Project".
How to run and produce builds
- In the main screen, click the green "play symbol" on the bottom left to run the project directly.
- Click the hammer on the bottom left to generate a build (does not run the build though).
Build results will be placed in a folder at the same level as the "chatterino2" project folder (e.g. if your sources are at C:\Users\example\src\chatterino2, then the build will be placed in an automatically generated folder under C:\Users\example\src, e.g. C:\Users\example\src\build-chatterino-Desktop_Qt_5_15_2_MSVC2019_64bit-Release.)
- Note that if you are building chatterino purely for usage, not for development, it is recommended that you click the "PC" icon above the play icon and select "Release" instead of "Debug".
- Output and error messages produced by the compiler can be seen under the "4 Compile Output" tab in Qt Creator.
Producing standalone builds
If you build chatterino, the result directories will contain a chatterino.exe file in the $OUTPUTDIR\release\ directory. This .exe file will not directly run on any given target system, because it will be lacking various Qt runtimes.
To produce a standalone package, you need to generate all required files using the tool windeployqt. This tool can be found in the bin directory of your Qt installation, e.g. at C:\Qt\5.15.2\msvc2019_64\bin\windeployqt.exe.
To produce all supplement files for a standalone build, follow these steps (adjust paths as required):
- Navigate to your build output directory with Windows Explorer, e.g.
C:\Users\example\src\build-chatterino-Desktop_Qt_5_15_2_MSVC2019_64bit-Release - Enter the
releasedirectory - Delete all files except the
chatterino.exefile. You should be left with a directory only containingchatterino.exe. - Open a command prompt and execute:
cd C:\Users\example\src\build-chatterino-Desktop_Qt_5_15_2_MSVC2019_64bit-Release\release
C:\Qt\5.15.2\msvc2019_64\bin\windeployqt.exe chatterino.exe
Go to
C:\local\bin\and copy these dll's into yourrelease folder.libssl-1_1-x64.dll libcrypto-1_1-x64.dll ssleay32.dll libeay32.dll
- The
releasesdirectory will now be populated with all the required files to make the chatterino build standalone.
You can now create a zip archive of all the contents in releases and distribute the program as is, without requiring any development tools to be present on the target system. (However, the vcredist package must be present, as usual - see the README).
Using CMake
Open up your terminal with the Visual Studio environment variables, then enter the following commands:
mkdir buildcd buildcmake -G"NMake Makefiles" -DCMAKE_BUILD_TYPE=Release -DUSE_CONAN=ON ..nmake
Building on MSVC with AddressSanitizer
Make sure you installed C++ AddressSanitizer in your VisualStudio installation like described in the Microsoft Docs.
To build Chatterino with AddressSanitizer on MSVC, you need to add -DCMAKE_CXX_FLAGS=/fsanitize=address to your CMake options.
When you start Chatterino, and it's complaining about clang_rt.asan_dbg_dynamic-x86_64.dll missing, copy the file found in <VisualStudio-installation-path>\VC\Tools\MSVC\<version>\bin\Hostx64\x64\clang_rt.asan_dbg_dynamic-x86_64.dll to the Chatterino folder inside your build folder.
To learn more about AddressSanitizer and MSVC, visit the Microsoft Docs.
Building/Running in CLion
Note: We're using build instead of the CLion default cmake-build-debug folder.
Install conan and make sure it's in your PATH (default setting).
Clone the repository as described in the readme. Open a terminal in the cloned folder and enter the following commands:
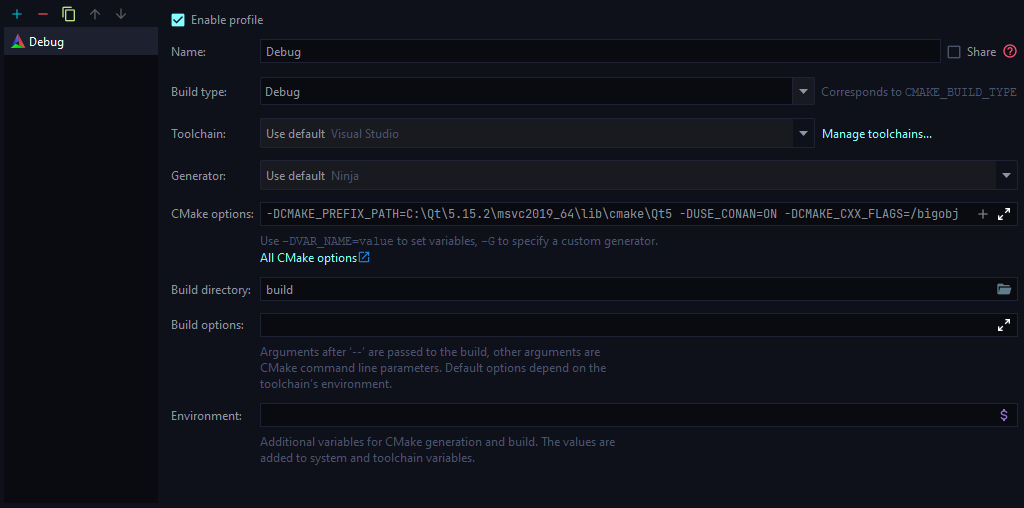
mkdir build && cd buildconan install .. -s build_type=Debug
Now open the project in CLion. You will be greeted with the Open Project Wizard. Set the CMake Options to
and the Build Directory to build.
<details>
</details>
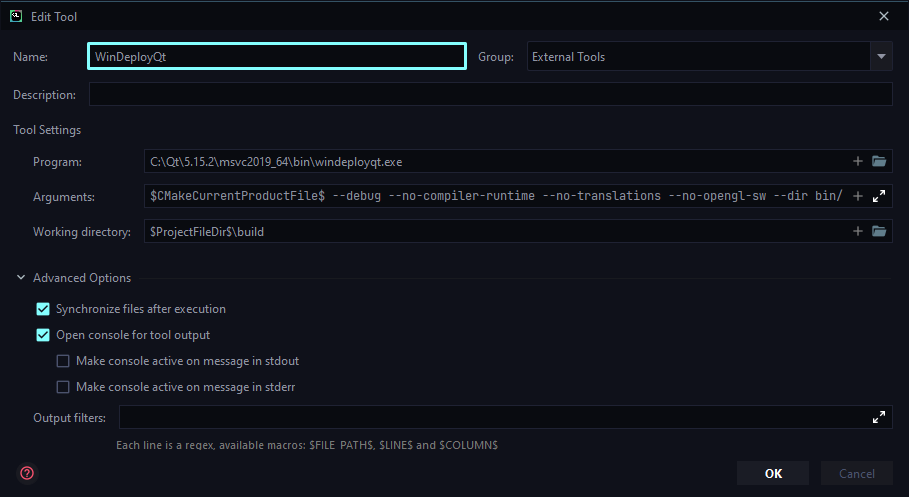
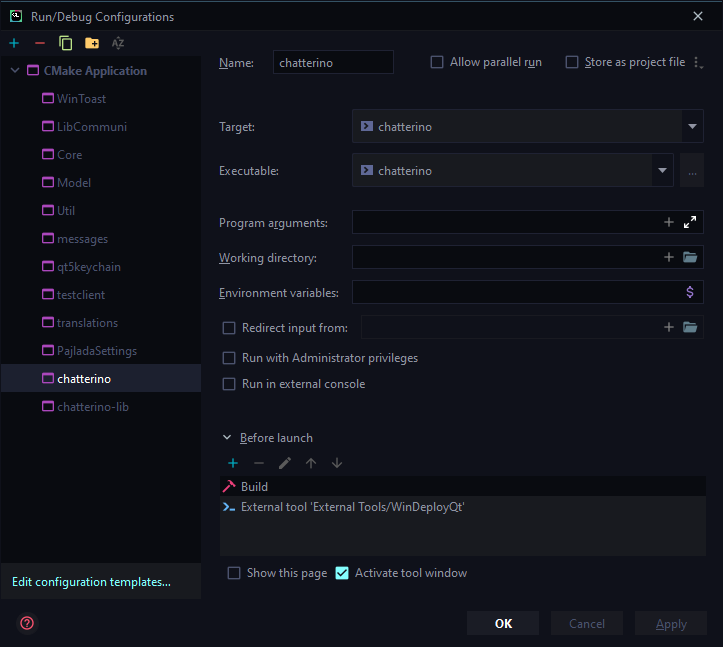
After the CMake project is loaded, open the Run/Debug Configurations.
Select the CMake Applications > chatterino configuration and add a new Run External tool task to Before launch.
- Set the Program to
C:\Qt\5.15.2\msvc2019_64\bin\windeployqt.exe - Set the Arguments to
$CMakeCurrentProductFile$ --debug --no-compiler-runtime --no-translations --no-opengl-sw --dir bin/ - Set the Working directory to
$ProjectFileDir$\build
<details>
Screenshot of External tool
</details>
<details>
Screenshot of chatterino configuration
</details>
Now you can run the chatterino | Debug configuration.
If you want to run the portable version of Chatterino, create a file called modes inside of build/bin and write portable into it.
Debugging
To visualize QT types like QString, you need to inform CLion and LLDB about these types.
- Set
Enable NatVis renderers for LLDB optioninSettings | Build, Execution, Deployment | Debugger | Data Views | C/C++(should be enabled by default). - Use the official NatVis file for QT from
qt-labs/vstoolsby saving them to the project root using PowerShell:
Now you can debug the application and see QT types rendered correctly. If this didn't work for you, try following the tutorial from JetBrains.